This page details how to install nagrestonf on Raspbian Wheezy.
Packages that nagrestconf depends on, such as Nagios and Apache, will be installed automatically.
The instructions on this page are for installing nagrestconf and its requirements on a new server,
It is not recommended to follow these instructions on an existing server that is currently being used. It might break other applications on the server since packages might be upgraded.
Installation consists of the following steps:
Get the packages for Debian from the download page then copy them to the server.
Open a terminal window or ssh session then install nagrestconf and all plugins:
apt-get update
apt-get install gdebi-core sudo
gdebi nagrestconf_1.173_all.deb
dpkg -i nagrestconf-services-plugin_1.173_all.deb \
      nagrestconf-services-bulktools-plugin_1.173_all.deb \
      nagrestconf-hosts-bulktools-plugin_1.173_all.deb \
      nagrestconf-backup-plugin_1.173_all.deb
Use the two helper scripts 'nagrestconf_install' and 'slc_configure'.
nagrestconf_install -a
slc_configure --folder=local
For Debian Wheezy add the crontab to the correct location.
This is not required for Debian Lenny.
cat /var/spool/cron/root >>/var/spool/cron/crontabs/root
chmod 0600 /var/spool/cron/crontabs/root
service cron restart
Change two variables in nagios.cfg
sed -i 's/check_external_commands=0/check_external_commands=1/g' /etc/nagios3/nagios.cfg
sed -i 's/enable_embedded_perl=1/enable_embedded_perl=0/g' /etc/nagios3/nagios.cfg
Relax permissions for the pipes
chmod 770 /var/lib/nagios3/rw/
Create a password for nagrestconfadmin - for GUI access to nagrestconf.
htpasswd -bc /etc/nagios3/nagrestconf.users nagrestconfadmin a_password
Note that, by default, the nagrestconf GUI can only be reached from the host it was installed on, localhost. To enable connecting to nagrestconf from other hosts edit the apache configuration.
For example,
Edit /etc/apache2/conf.d/nagrestconf.conf:
cp /etc/apache2/conf.d/nagrestconf.conf /tmp
sed -i 's#AuthUserFile .*#AuthUserFile /etc/nagios3/nagrestconf.users#i' \
    /etc/apache2/conf.d/nagrestconf.conf
sed -i 's/allow from 127.0.0.1/allow from all/i' \
    /etc/apache2/conf.d/nagrestconf.conf
sed -i 's/#Require/Require/i'     /etc/apache2/conf.d/nagrestconf.conf
sed -i 's/#Auth/Auth/i'     /etc/apache2/conf.d/nagrestconf.conf
Restart apache and nagios
service apache2 restart
service nagios3 restart
The nagios restart will show errors since the configuration is empty.
The nagrestsconf and nagios web interfaces should be accessible now.
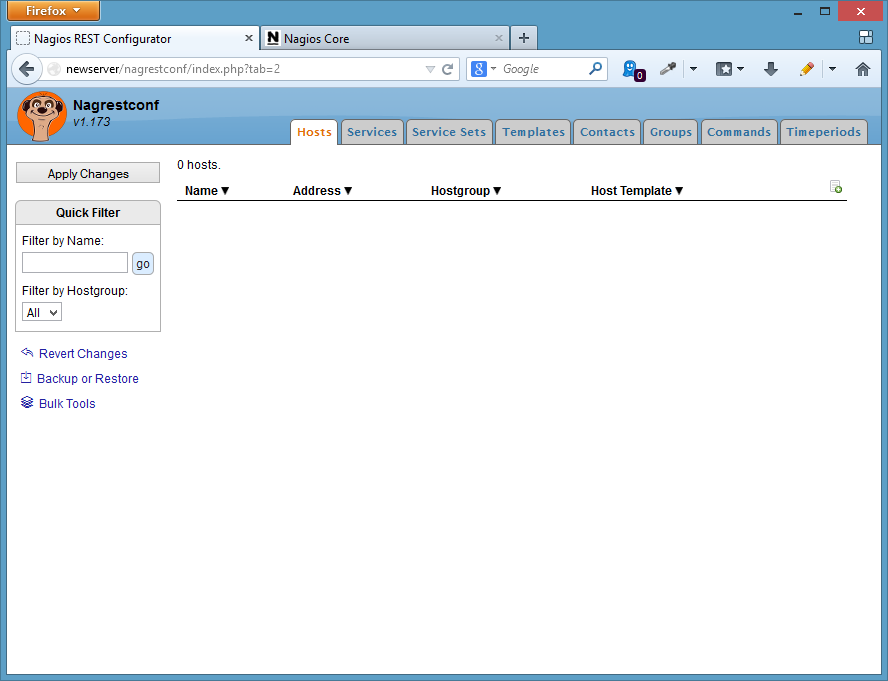
Log into nagrestconf with user 'nagrestconfadmin', and the password that was set above.
The nagrestconf interface, at 'http://server/nagrestconf', will look like the following screen shot.
Log into nagios with user 'nagiosadmin', and the password that was set above.
The nagios interface, at 'http://server/nagios3', will look like the following screen shot.
To create a simple test configuration use a script that makes REST calls, or use the 'Backup/Restore' button in the nagrestconf GUI. The latter method will be used in this guide.
An example configuration can be downloaded from this link, then log into nagrestconf and use the 'Backup/Restore' button.
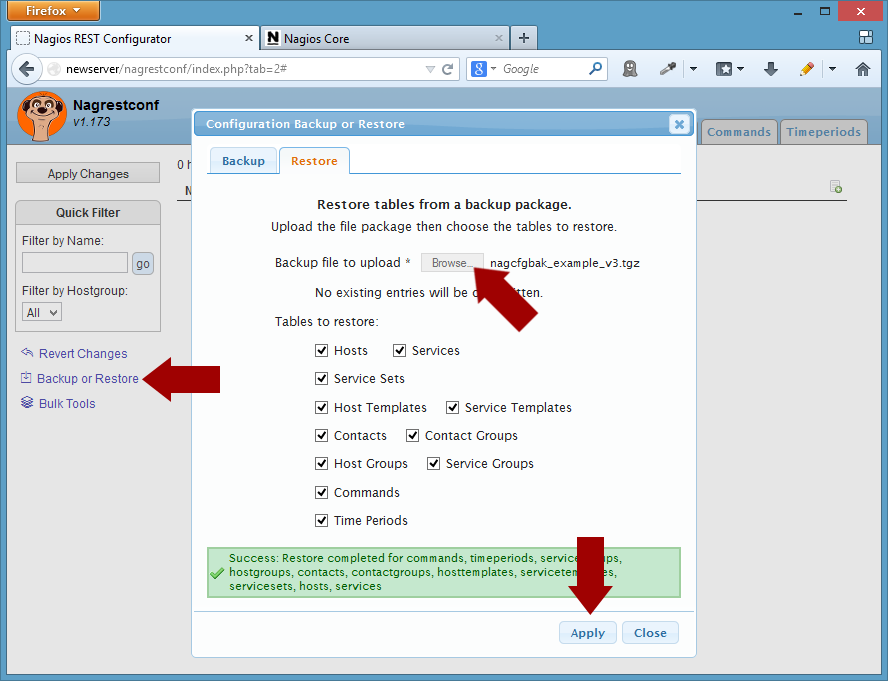
Click 'Close' in the 'Backup/Restore' dialog then refresh the page.
The new configuration will not appear in the Nagios Web interface until the 'Apply Changes' button is clicked, and then applied.
That's it!
comments powered by Disqus Nagrestconf